
Preparing for Use - Adding Students
Before you can use the TimeTracker, you will need to, at a minimum, add students from your caseload to the TimeTracker. Additionally, you may also choose to modify the reasons to document how your time is spent, create groups, and set a password. Each of these tasks can be accomplished by clicking on the appropriate button under the Setup area of the TimeTracker main user interface.
NOTE: It is critical that the Student ID number be unique for all students. This number is how the TimeTracker keeps track of individual students. It is recommended that you use the Student ID number the student already has in your school’s student information system. Using the student information system Student ID number will allow you to merge your TimeTracker data with student information system data later using the ‘export’ function available in the TimeTracker, and a function built into the EZAnalyze data analysis tool.
Adding Students from your Caseload to the TimeTracker - One at a Time
1. Click on Edit Student(s) in the Setup area.
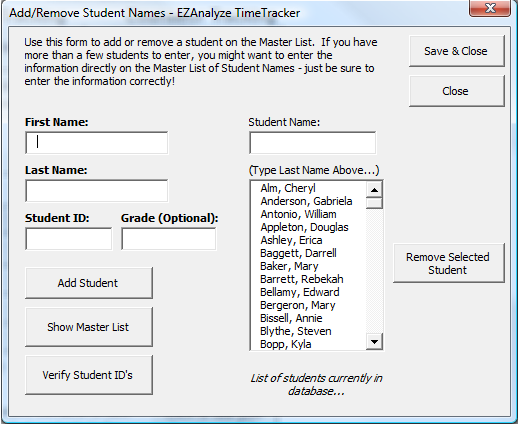
2. You can now enter students one at a time by entering their first name, last name, student ID, and grade (optional), and clicking the Add Student button.
3. When you have finished adding students, click on the Save & Close button to save your work.
Adding Students from your Caseload to the TimeTracker - in Bulk
1. Click on the Show Master List button in the Add/Remove Student Names dialog box to see the sheet below:
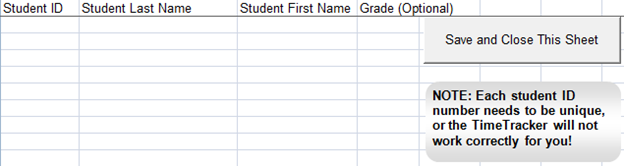
2. Take note of how this sheet is structured, with Student ID in the first column, Last Name in the second column, First Name in the third column, and the optional Grade level in the fourth column.
3. Using your student information system, export the student ID's, names, and grades and arrange in a format identical to the one above. Hint: if you do not know how to do this, ask around in your school to find someone who does.
4. Once you have this information about your caseload in the correct format, simply copy and paste it into the TimeTracker. Be sure to leave the column titles in row 1 intact.
5. Click on the Save and Close This Sheet button to save the file and close the sheet.
Verifying Student ID Numbers
As noted previously, having unique student ID numbers is critical for
the TimeTracker to function properly. To verify that all of your student
ID numbers are unique, click on Edit Students in the Setup area of the
main user interface, then click on the Verify Student ID’s button
in the Add/Remove Student Names form. Any problems that exist will be identified
for you.