
Using the TimeTracker: Student Tracking
Once you have input the students on your caseload into the TimeTracker, you are now ready to start using it to document your interactions with them. The mechanism you will use to track your time is revealed by clicking on Track Time With Students in the Student Tracking area of the Main user interface, which will reveal the dialog box below:
![]()
Recording Time with a Single Student Using the Timer
1. Select Individual(s) in the Select Type of Session area.
2. Select a student from the list of students. Hint: begin typing the student's last name in the Student Name box to quickly scroll through the list
3. Click Start Timer in the Times section of the dialog box. The button now changes to say 'Stop Timer'.
4. After you have finished your meeting with the student, select a Reason, and enter any notes you would like to in the Brief Notes box.
5. Click Stop Timer, and verify the information is correct in the Message that appears.
Recording Time with a Single Student Using the Input Time Function
There may be times when you meet with students and are not able to use the timer to record your meeting. For those cases, follow the steps below to record the session at a later time:
1. Select Individual(s) in the Select Type of Session area.
2. Select a student from the list of students.
3. Select a Reason, and enter any notes you would like to in the Brief Notes box.
4. Click Input Time in the Times section of the dialog box. The dialog box below is revealed:
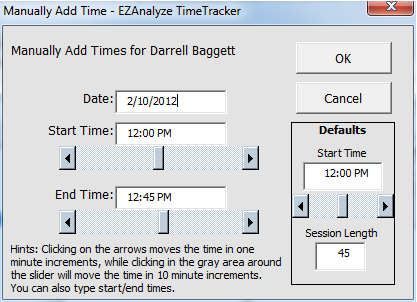
5. Modify the Date as needed, and type or use the scroll bars to quickly set the Start Time and End Time. Hint: clicking on the arrows moves the time in one minute increments, while clicking in the gray area between the slider and the arrow will move the time in 10 minute increments
6. Click OK, and verify the information was recorded correctly in the Message that appears.
Setting a Default Start Time and Session Length
1. To set a Default Start Time, type in the time (or use scroll bar) you would like to set as the default for manually adding time.
2. To set a Default Session Length, type in the number of minutes that
most closely approximates a 'normal' session with a student.
Recording Time with Multiple Students Using the Timer - Creating an Ad Hoc Group
The steps for recording time with multiple students using the timer are identical to the steps for recording time with a single student, except that you select more than one student, and have the option to give the ad hoc group a name. Note that recording time with multiple students is different than recording time spent with predefined groups.
1. Select Individual(s) in the Select Type of Session area.
2. Select at least two students from the list of students.
3. Click Start Timer in the Times section of the dialog box.
4. After you have finished your meeting with the students, select a Reason, and enter any notes you would like to in the Brief Notes box.
5. Click Stop Timer.
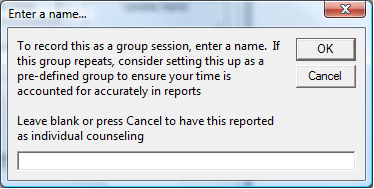
6. In the Enter a name box that appears (pictured
below), you can:
a. Enter a name to create an ad hoc group. This will
record the time you spent with the students as a group
counseling activity, and later reports will reflect the time as
group
counseling. Click OK after
naming
b. Leave the name blank and press OK or Cancel. This
will record the time you spent with each of the students
as individual counseling ,
and later reports will reflect the time as individual
counseling
7. Verify the information is correct in the Message that appears.
Recording Time with Multiple Students Using the Input Time Function - Creating an Ad Hoc Group
The steps for recording time with multiple students using the input time function are identical to those for recording time with a single student using input time, except that you select more than one student, and have the option to give the ad hoc group a name
1. Select Individual(s) in the Select Type of Session area.
2. Select at least two students from the list of students.
3. Select a Reason, and enter any notes you would like to in the Brief Notes box.
4. Click Input Time in the Times section of the dialog box.
5. In the Enter a name box that appears, you can:
a. Enter a name to create an ad hoc group. This will
record the time you spent with the students as a group
counseling activity, and later reports will reflect the time as
group
counseling. Click OK after
naming
b. Leave the name blank and press OK or Cancel. This
will record the time you spent with each of the students
as individual counseling ,
and later reports will reflect the time as individual
counseling
6. Modify the Date as needed, and use the scroll bars to quickly set the Start Time and End Time.
7. Click OK, and verify the information was recorded correctly in the Message that appears.
Recording Time with a Predefined Group
Recording time spent with groups you have previously setup in the TimeTracker is similar to using the Input Time function to track time spent with individual students. Using the timer to record time spent with predefined groups is currently not possible.
1. Select Group(pre-defined) in the Select Type of Session area.
2. Select a group from the list of groups.
3. Select a Reason, and enter any notes you would like to in the Brief Notes box.
4. Click Input Time in the Times section of the dialog box.
5. Modify the Date as needed, and use the scroll bars to quickly set the Start Time and End Time.
6. Click OK, and verify the information was recorded correctly in the Message that appears.