
Preparing for Use - Creating Groups
The Groups feature of the TimeTracker allows you to put students from your caseload into groups to allow you to more easily track your time spent with multiple students. This function is particularly useful for tracking guidance curriculum and group counseling work with students. If you are meeting with a group of students only once or twice, you can create an 'ad hoc' group, described in the Student Tracking section.
1. Click on Edit Groups in the Setup area.
2. You will now see the dialog box below:
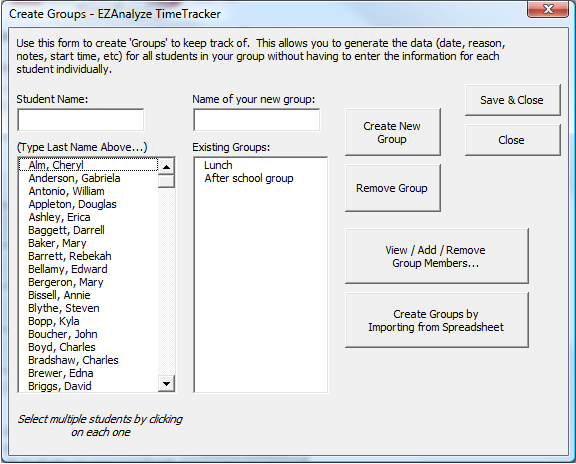
3. To create a new group:
a. Select students from the list of student names (click on
each one once)
b. Provide a name for your group in the space provided (Do
not duplicate group names)
c. Click on Create New Group
4. Repeat as needed, and click Save & Close when finished.
NOTE: You will be able to de-select students who are absent when you record the time you spend with them. Also, if a group member is removed, the time you documented with them will remain recorded, and reported in reports.
Creating Groups using the Import Groups from Spreadsheet function
If you have many groups to create, you will likely find it easier to create groups in the TimeTracker by using this function, which will create the groups for you from a list you provide. Instructions for structuring your list are provided in the TimeTracker, and below.
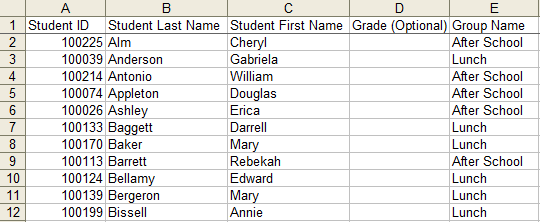
How student information
should be structured to automate group creation
To automate the process of creating groups, structure the data as indicated above in Row 1 of another Excel workbook, then copy and paste the data into the TimeTracker. Row 2 must contain your first student's information; copy and paste only the student information.
Only the Grade level is optional and can be left blank - all other data points (Student ID, last and first name, and group name) must be present. The data do not need to be sorted in any sort of order
All of these students' information should also be in the 'Student Names' sheet, which you can access under Edit Students from the Setup area.
1. Click on Edit Groups in the Setup area.
2. Click on Create Groups by Importing from Spreadsheet in the Create Groups form
3. Copy (Ctrl C) the list of student names and groups from the worksheet you created outside of the TimeTracker (highlight all of the student information beginning in Row 2 and ending in Column E)
4. On the ImportGrps worksheet of the TimeTracker, click on the cell in Column A, Row 2, and Paste (Ctrl V) the list. Ensure it is structured correctly.
5. Once you are sure your data are structured appropriately, click Create Groups in the ImportGrps worksheet of the TimeTracker to create your groups.
NOTE: The information in this sheet will be removed upon completion of
the group creation process, so please keep a copy of the work you have
done in another file until you are sure the groups were created properly.